|
I’ve been trying to get Consult 3 plus V46.11.00 to work with my NEXIQ usb link. Nexiq supports J2534 so i figured I would give it a shot. I have a CF-19 Tough book which contains all me software for diagnostic. The CF-19 runs in deep freeze all the time to prevent any issues. So I typically test software I acquire on my desktop first. Long story short I installed it on my Desktop edited the .ini file and got it to show connection to my nexiq. (Haven’t tested on a car because my desktop is in my living room). So I thought I was good even wrote a short tutorial to keep with my backups of software. I then installed on the CF-19. Edited the .ini. Expected to the the USB connection with the blue dot.... Nothing. I installed both exactly the same. Im running identical versions Windows 7. There is quite a bit of software on my CF-19 I don't if its interfering or not. Does anyone have any ideas. To be so close to it working but not able to test is frustrating. Below I will put my short tutorial to show the steps I took and also maybe it will help others. (This is not my work just the steps I found on here)
J2534 PassThru for Nissan Consult 3 plus 1. Install Niassan Consult III+. 2. Make sure the driver for your PassThru is installed. 3. Open regedit.exe 4. Navigate to HKEY_LOCAL_MACHINE > SOFTWARE > Wow6432Node > PassThruSupport.04.04 5. From there choose your device. (For example I have a Nexiq Usb-link, so I choose either " NEXIQ Technologies - USB-Link" or "NEXIQ Technologies - USB-Link Bluetooth". I choose to use standard USB-Link) 6. Once you've click on your device look in the right column for "Name" 7.Right click on "Name" and choose "Modify..." 8. A window will appear copy exactly what it say in the "Value data:" box. (For example mine is "NEXIQ USB-Link over USB") 9.Close regedit. 10. Naviagte to "C:\CONSULT-III_plus\System\Application\ApplicationData\CommonSetting" 11. Open "DiagnosticTool.ini" 12. Copy & Paste the text below under "access_mode=1" in DiagnosticTool.ini with the exeption of putting the text you copied from regedit in place of "!!!!YOUR_DEVICE_NAME!!!!": [device] vi_device_name=!!!!YOUR_DEVICE_NAME!!!! [mode] debug_mode=TRUE debug_mode_vehicle_battery=TRUE" 13. Done Ps. special thanks to the one share tips above at http://mhhauto.com/ Original:How to get Consult 3 plus work with NEXIQ usb link
0 Comments
With the newly release of Volvo 88890180 (VCADS) in diyobd2.fr, Volvo Truck technician will have one more option to select the diagnostic scanner. So I will share what they can do and how to work.
1. Multilanguage Volvo 88890300 Vocom Interface
88890300 Vocom Interface is already recognized by some Volvo technicians because it’s good quality, the function and the price fit the technician needs.
Volvo 88890300 Vocom Interface update and OS:
Vocom update and OS depends on its two separated software: PTT1.12/2.40 and PTT2.03/3.02 1. Software version: PTT1.12/2.40, software come with package for free, this software must installed on Windows XP system computer. Support Multi-languages. 2. Software version: PTT2.03/3.02. This is latest software version. This software need additional purchase, price is 230usd. Support install on windows 7 professional or ultratme, support multi-languages.
Volvo 88890300 Vocom Interface Functions:
Identify a product. View information history. Diagnose a selected product. Test a selected product. Program a selected product. Calibrate a selected product.
Volvo 88890300 Vocom Interface can work with these trucks:
Volvo Trucks (Older electrical system, Vehicle electronics '98, V2, V3, V4); Volvo Buses (Conventional, Multiplexed, Multiplexed v2, Multiplexed v3); Volvo Construction Equipment; Volvo Penta (VERSION2); Volvo OEM Component Customer (VERSION2); Mack Trucks (V-MAC I/II/III, ITC, IV, IV+); Renault Trucks (VERSION2); UD Trucks (VERSION2)
2. Multilanguage Volvo 88890180 (VCADS) interface
General information: Volvo Interface 88890180 is Developed for Volvo / Renault vehicles and engines and Enables PC-to-vehicle communication via USB cable or by a wireless LAN using the 802.11 b / g standard.
Volvo 88890180 (VCADS) vehicle list:
VOLVO TRUCKS:
AC, FM10, NH565, FH12, FM12, VHD, FH16, FM7, VN, WC, WG, WI, FH565, NH12, FL6, FL7, FL10, FL12, NH525, WX, COMP04, FE, VHD, FH, FM, VM, FM9, F10, F12, F16, NL10, NL12 VOLVO BUSES: B10B, B10M, B10L, B10R, M10R, B12, B58, B6, B7R, OLYMPIAN, SUPEROLY
VOLVO CONSTRUCTION EQUIPMENT (EC)
Wheel loader: L110E, L110F, L120E, L120F, L150E, L150F, L180E, L180F, L220E, L220F, L330E, L350F, L60E, L60F, L70E, L70F, L90E, L90F Articulated Hauler: A25D, A25E, A30D, A30E, A35D, A35E, A40D, A40E, T450D Excavator: EC135B, EC140B, EC140C, EC160B, EC160C, EC180B, EC180C, EC210B, EC210C, EC235C, EC240B, EC240C, EC290B, EC290C, EC330B, EC330C, EC360B, EC360C, EC460B, EC460C, EC700C, EC700B, EC700C, ECR145C, ECR235C, ECR305C, EW140B, EW140C, EW145B, EW145C, EW160B, EW160C, EW180B, EW180C, EW200B, EW210C, FC2121C, FC2421C, FC2924C, FC3329C, PL4611 Grader: G710B, G720B, G726B, G730B, G740B, G746B, G780B, G930, G940, G946, G960, G970, G976, G990 Compact Excavator: ECR88
RENAULT TRUCKS (with DXi engines):
CESAR, KERAX, KERAXMIL, MAGNUM MIDLUM PREMIUM, SH 23, SH 510
Here is the detail instruction on how to program EEPROM with digiprog 3 odometer correction tool through “EEPROM†menu.
On some vehicles you can see an eight pin EEPROM chip which is used to store the vehicle data and these chips grasp vital information from the vehicle such as ignition and immobilizer codes. Once you lose those data, it may cause anything from minor fault to major faults and even make you have to repair your machine, so it is very important to use the digiprog3 “EEPROM†menu to read and save the original information.
The EEPROM chip would have a number on the top of itself and usually it will be “93C46″, you can connect it to your digiprog III via ST1 or ST4 adaptor. Then you should tell your digiprog III which chip you are working on before you use it to read.

How to program EEPROM using digiprog 3 mileage correction kit?
1. De-solder EEPROM chip;
2. Confirm the contact points or legs with glass fiber pin thoroughly;
3. Clean clearly with sandpaper;
4. Insert EEPROM correctly into Digiprog3 ST01/ST04 adapter, and make sure they are well contacted;
5. Connect DP3 device to your car via OBD connector
6. Enter “EEPROM†menu

7. Read data from EEPROM and store them in digiprog3; Follow this way:
Select the “SET TYPE†and choose “93C46″, then your digiprog has been set up to read a 93C46 chip. Press “EEPROM†again and then “READâ€. There will show you the information on the digiprog III screen when the reading is complete. Now press “VERIFY†so the information on your screen can agree with the Eeprom.
Next click the “FILE†and there will show you another sub-menu, you can click “SAVE†and enter a file name for the information you are saving. Once you entered the file name, your data is safe and the vehicle is now ready to be reprogrammed.
8. Get EEPROM from ST01/ST04 adapter and reload it;
9. Select the function EEPROM COMPARE;
10. Then it is the previous read data on digiprog 3 but not the internal memory, comparing it with the now re-inserted EEPROM;
NOTE:
Error message may appear during the process, restore or reprogram, restore the original data status and it will be fixed.
Apart from DigiProg 3 “EEPROM†Menu, it also have “CAR/TRUCK†Menu, “Motorcycle†Menu, “Special Functions†Menu and “Setup†Menu.
More Digiprog 3 main unit and cables information, please check here:
If you have lost the master key and badly need a new key programmed, you will be quoted euro 50-euro 200 from one place to another. It is a bit expensive. What device can you program a Peugeot new key?
Diyobd2.fr here gives some suggestions:
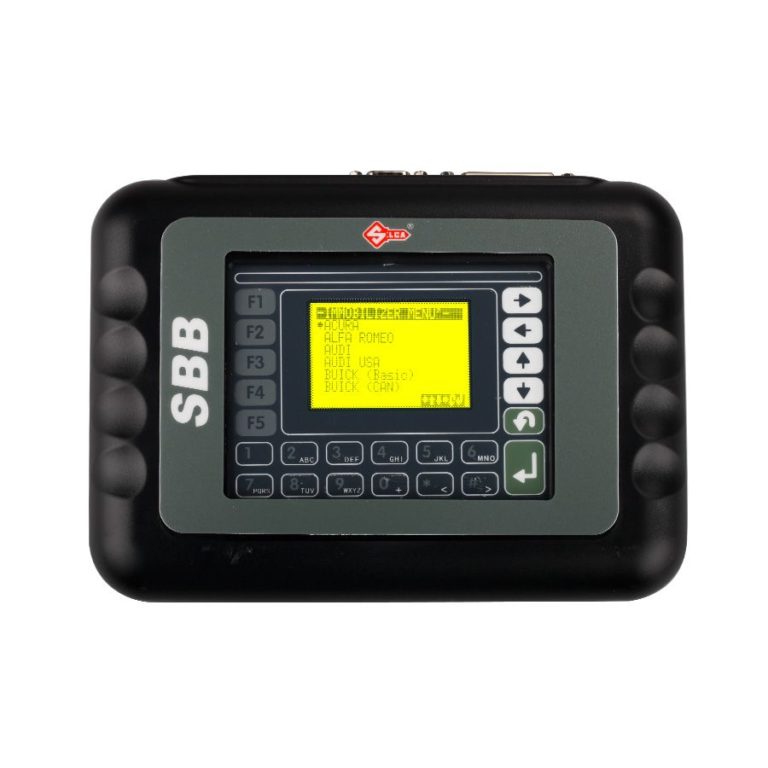
1) SBB V33 auto key programmer (French available)
The clone Silica SBB V33 key programmer will program my Peugeot 307 HDI spare key via immobilizer. But you need a pin code from BSI dump. There is a step-by-step document instruction:
http://diyobd2pro.blogspot.com/2015/03/how-to-program-peugeot-307-can-2009-key.html http://www.slideshare.net/spobd2/program-peugeot-307-can-2009-key-with-french-sbb-v33-key-programmer If you have other car models, check the vehicle list first, http://www.diyobd2.fr/upload/pro/listado-de-sbb-vehicles-atendibles-2010.pdf
2) Lexia-3 cable Peugeot Planet 2000/Diagbox
For Peugeot, it is better to use lexia 3 PP2000 to erase and add new key.
You need a programmer to read dump from BSI to find the pin code/confidential code in case you don’t have it and use PP2000 or diagbox to program the key.    3) Zed Bull transponder clone key programmer
Zed Bull and Silica SBB V33 complete each other. With zedbull you can find pin code from dump and programming transponder directly from immo dump so in many cases you don’t need the car and SBB is connected to OBD port and you need pin to program transponder on the car.
In conclusion:
Both Lexia 3 interface and SBB key programmer requires a pin code to access. But Zed Bull key pro does not need. Lexia3 XS Evolution will not program all Peugeot key, so better choose SBB v33 because it cheap at twice the price than Zed Bull.
Prompt:
Peugeot 307 OBD diagnostic connector location 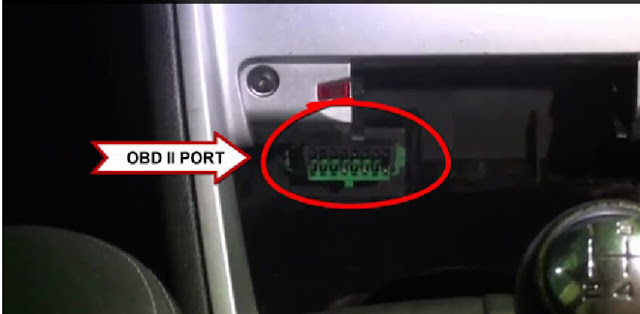 On the right of steering wheel is a big plastic scew, turn that (will not come out) pull on cubby hole, whole bit of trim comes of and its there.
This blog is a tutorial for you to perform forced regeneration of DPF using HondaHDS HIM diagnostic tool. Let’s go straight to the point!
First question: Replace DPF or regenerate DPF filter?
The correct decision must take into account the vehicle’s intended use and driving style. If the vehicle is to be used for short, stop-start journeys, with few frequent, then removal is recommended. If the vehicle will be driven hard, with high frequency long journeys, then it’s better to regenerate DPF to save cost.
Second question: How to use Honda HDS HIM perform forced regeneration of DPF?
(This guide demonstrates Honda Civic 8 as an example.)
Tool you need:
1. Honda HDS HIM
 
Before starting you should make sure:
- You need a PC laptop with stable power charge and avoid power cut during the operation.
- The process takes about 30min. So either you stay in the car while time is still on or off with the PC: not to go back in the car during the regeneration, avoids interactions with it to avoid problems.
- If you use an adapter Com (232) -> USB, verify that the com port is set to COM1. The interface does not work on another COM port!
- Check the oil level before and after regeneration. If after regeneration, the oil level is too high or if it stinks diesel will require draining.
- Disable the energy saving USB, antivirus, internet and all that can use PC resources.
Steps to regenerate DPF filter:
1) To start regeneration, you should first make the car exhaust get to a hot enough temperature, ideally around 600 degrees Celsius. Open the hood and disable all pump energy (ceiling, etc ...) and especially not fun to reactivate during operation.
2) Connect the Honda HDS scanner with car and laptop. Start Honda HDS software then turn car ignition on to position II.
3) Press the "Select a new vehicle" and enter the mileage.

Select "System" then "Diesel"

4) Check and delete the DTC, menu "DTC - given frozen". It’s necessary to remove DTC codes before operation and also check the various sensors of the DPF.

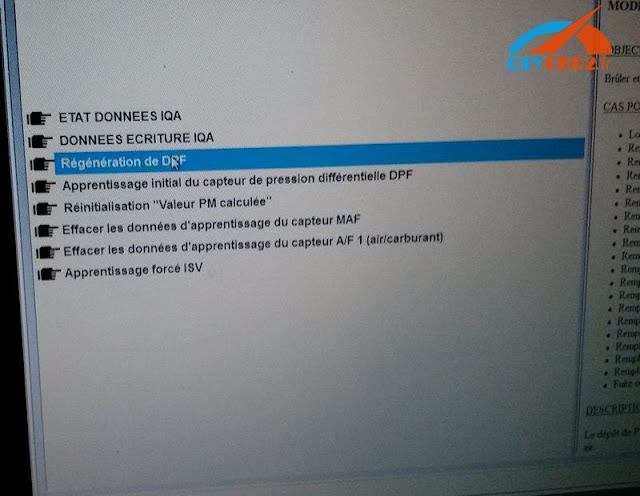
After that go back to "Settings" and select "DPF Regeneration"
5) Put the engine keep running. Turn on the lights and the air conditioner. (If the engine is not the right temp, HDS will ask to accelerate between 1600 and 2400trs/min. When the temp is reached, HDS takes over, release the accelerator.)
6) Allow HDS to regeneration. The engine mounts alone at 3000trs/min during regeneration. It is stagnant at 1500 trs/min. At the end of the regeneration scheme dates back to 3000 trs/min to cool the exhaust line (weird, but it is like here)

7) When the regeneration is complete, quit HDS, turn off engine, remove the cables from HIM and go for a ride to make sure the cooling line. In this way you can use Honda HDS HIM diagnostic tool to regenerate DPF to save lots of money!
Have got the alliance vi to work with Consult3 plus software. And make Consult III+ to run it with Ford VCM II interface.
CarDaq
Actica Passthru+ XS Python1B Nissan USB Diag Alliance VI And The obvious tool VI2
all these are the best to work with Consult 3 plus.
others will also work but maybe not as well.
The Ignition ON its not seen if you use VCM II
I use AVDI and Ignition ON it is not seen too I read that no matter what j2534 tool you use the Ignition ON its not seen Probably, only if use Alliance VI2, but alliance vi is quite a bit more complicated to set up
Here is thesetup of VCM II with Nissan Consult 3+.
For ford VCMII
In the Diagnostictool.ini put Ford-VCM-II Install the consult 3 plus Install your VCMII Manager and drivers. In passthru 4.04 in reg edit and rename NISSAN_VI2 To something else change name Bosch Ford-VCM-II to NISSAN_VI2 Reboot computer and test it
I tested it once with limited success.
Attachment: [Diagnostictool.ini]
Note 1: [alliance vi]
The sonde alliance vi is the end for the sonde can clip RTL. remplaced by sonde alliance vi but what is it.
Renault Aliance VCI = 100% Same with Nissan Consult III VCI...
Just & ONLY different name...
Note 2: [workable sw]Clone Consult III (who using patch) for to working with Nissan Consult III S/W, DID NOT working with Clip Software!!!
It seems now Clip S/W needs NEW "Pill" for Clones..
It’s verified that MPPS V18 clone can work on Audi A3 ecu Bosch ME7.1 without any issue.
MPPS V18 device in the test:

Diyobd2 engineers tested MPPS hardware v1.08.21.
Only this version with PCB design below can work with mpps v18 software.
 
Source: http://www.diyobd2.fr/wholesale/mpps-v18-main-tricore-multiboot-avec-breakout-tricore-cable.html
MPPS v18 software:
It’s version 18.12.3.8

Test model:
Audi A3 1.8L

The engineers test the MPPS V18 on Audi A3 for ECU id reading.
1) Plug MPPS V18 clone to the OBD port under the dashboard on the Audi A3 car and connect the other end of it to a laptop running MPPS V18 software.
2) Start the laptop, the car and then the MPPS V18 application software.
3) Select the language to use on the upper right corner. Here it’s English. It’s a multilingual version, covers more than ten languages.

4) Select the car make and car model. Here I select Audi and then A3.

5) Select the cars ECU type: “1.8L Bosch ME7.1 K-Line”.

6) Hit “ECU ID (F1)” at the bottom right on the MPPS interface.

MPPS V18 reading AUDI A3 Bosch ME7.1 K-Line success!
This blog is reviews on SBB Key Programmer V33 about what car and key programming are tested OK by other users. Hope it helps you!
SBB Key Programmer Tested OK Car List:
Opel
Opel Frontera 2.2 diesel: added a used remote OK
Opel Zafira 2.0 DTI 2001: (pin from dump) less than 3 minutes to finish
Opel Meriva 2011: read pin code ok, learn key ok
Opel Corsa C 2003/2004: read pin code ok, learn key ok
Opel Montana 2006: read pin code ok, learn key ok
Opel Astra G: program old keys ok, program new keys ok, remote programming ok. Need PIN
Ford
Ford explorer 2003
Ford Escape 2002: worked fine added key without other available working key
Ford Galaxy 2003 diesel: add new key very easy
Ford F150 2005: lost all keys, add key ok
Ford Cougar 2.5 V6 1998: work after erase all keys
Ford Fiesta 2006
Ford EcoSport 2007
Ford Focus 2002: a lot of ford no problem
VW
VW Passat B5 2004
VW Passat 2002: extract pin and program key all ok
VW Golf IV 1999: read pin works well, add key ok too
VW Golf 1999-2005, 2007, 2008: read pin code ok, learn key ok
VW Golf 4 TDI PD 2002: 4 digit pin code extract in 20 seconds
VW Touran 2004: all key lost, add key ok
Peugeot
Peugeot EXPERT 2012: added a new key, entered as 207 CAN and used a PCF7936, very easy
Peugeot 106 1.1 2000: (with dealer pin code) less than 3 minutes to finish
Peugeot 207 2008: key fob learning OK
Mitsubishi
Mitsubishi Carisma 2001: read pin code automatic, program key OK
Mitsubishi Pajero 2007
Mitsubishi Pajero 2000 diesel: lost key, programmed a 4D60 key
Mitsubishi SPACE STAR 2004: program key OK in one minute
Mitsubishi Lancer Evo VII: successfully programmed remote key with pcf7936 in few minutes
Hyundai
Hyundai Accent 2008
Hyundai Elantra 2009
Hyundai accent 2013: program new key fast
Fiat
Fiat Punto 2004: Add Key OK, but need pin code
Fiat Uno Economy 2012: add key ok
Fiat Idea 2007: add key ok
Honda
Honda Jazz 2006: all key lost no need pin, learn key ok
Honda Pilot 2003: 2 keys programmed from scratch- no problem
Honda Civic 2004: program key ok
Others:
Rover 45 and Rover 200: Remote Control Programming OK
Rover 25 engine 1.4: replace a faulty key fobs with other used, OK for 2 min
Chevrolet Celta 2003: read pin code ok, learn key ok
Chevrolet Optra 2007
Suzuki Swift 2007: all key lost, program new key ok
Suzuki Carry Bus 2010: program 4C key ok
Nissan Cabstar 2001: lost key, programmed ID41 chip in normal key
Subaru Legacy 2007: programmed 2 keys successfully
Citroen C3 2011 (made in France): all good
Mazda 6 2008: program key ok, need pin code
Renault Clio II 2002: add remote key with PCF7946 OK
GMC Yukon 2009: add key after counter of 720 sec
Dodge Avenger 2008: lost key, programmed a ID46 normal key
That’s all reviews on Silca SBB Immobilizer V33 diyobd2.fr collected for you. Hope it helps you!
This is VXDIAG VCX NANO for TOYOTA TIS Techstream review from one of our customers. Glad to hear that he is happy with this device and diyobd.fr will share his good experience as below. Hope it helps!
 I bought this VXDIAG VCX NANO for Toyota at diyobd.fr and received it after 6 days. The CD has software “VX Manager” and “Techstream”.  After installed all things I plugged this scanner to my car’s OBD2 port and connected it to my laptop.  Opened Techstream software and I clicked “Connect to vehicle”.  It showed me the car information.  There were many functions available: Health Check, Customize Setting and ECU Reprogramming…  And below the System Selection Menu, I saw many items. Apart from “ECU”, “Door control” and “ABS”, following picture showed more.  In a word, I am happy so far with this VXDIAG VCX NANO Toyota I use this scanner on Techstream to customize my car and car get better!
Free Download SKP900 V4.5 (New released):
http://www.superobd.com/DownLoad/SKP900V4.5.zip
SKP-900 V4.5 key programmer new update:
-Dodge RAM1500 PIN CODE Read by OBD 2006 -Dodge RAM1500 Remote Key Program 2006 -Correction and add Toyota models: SIENNA; ALPHARD; CAMRY; PRADO; RAV4; CROWN; COROLLA; REIZ; LAND CRUISER; VIOS; TUNDRA; HIGHLANDER; EZ; LEVIN; PRIUS; YARIS; PREVIA  |
obd2diy.fr:
obd2diy.fr s'applique spécialement à fournir d'appareil diagnostic auto - OBD2 Français Valise Diagnostique. Nous offrons des produits de haute qualité, le meilleur service et le prix le plus compétitif 存档
October 2019
类别 |

 RSS Feed
